

LinkedIn Sales Navigator is no longer just a fancier version of LinkedIn search. In 2026, it functions as an AI-powered prospecting system that quietly analyzes intent signals, buying committees, and engagement patterns long before you ever send an InMail. For B2B teams that rely on outbound and Account Based Marketing (ABM), that difference is the line between “spray-and-pray” outreach and a predictable, compounding pipeline.
Used well, Sales Navigator becomes the control center for your entire prospecting motion. Instead of chasing every profile that looks vaguely relevant, you focus on a tightly defined ICP, live intent triggers, and relationship paths that actually convert. The AI features—Account IQ, Lead IQ, Message Assist, Relationship Explorer, and the latest search enhancements—compress hours of research and drafting into a few focused minutes.
This LinkedIn Sales Navigator guide is built to help you operate Sales Navigator the way top 1% B2B teams do: as a structured, repeatable system rather than an expensive contact list. You’ll learn how to translate strategy into saved searches, lead and account lists, research workflows, and message frameworks that are easy to run every week.
Whether you’re a solo founder, an SDR team lead, or a B2B Growth Marketing Agency managing multiple clients, the goal is the same: turn Sales Navigator into a reliable engine for qualified conversations and revenue, not just another SaaS subscription.
Table of Contents
Part 1: Foundation & Strategy
Step 1: Define Your Ideal Customer Profile (ICP) and Personas
Before launching any search, establish a detailed ICP with both firmographic and behavioral criteria. Generic targeting dilutes results; precision compounds them.
Action Items:
- Document target company characteristics: industry, company size (employee count), revenue range, growth stage, geographic location, technology stack, and funding status
- Define buyer personas beyond job title: seniority level, years in role, recent transitions, and pain points
- Identify both primary decision-makers (who owns the budget) and secondary influencers (who influences the decision)
- Map trigger events that signal buying readiness: headcount growth, recent funding, new product launches, or technology migrations
Step 2: Choose the Right Sales Navigator Plan
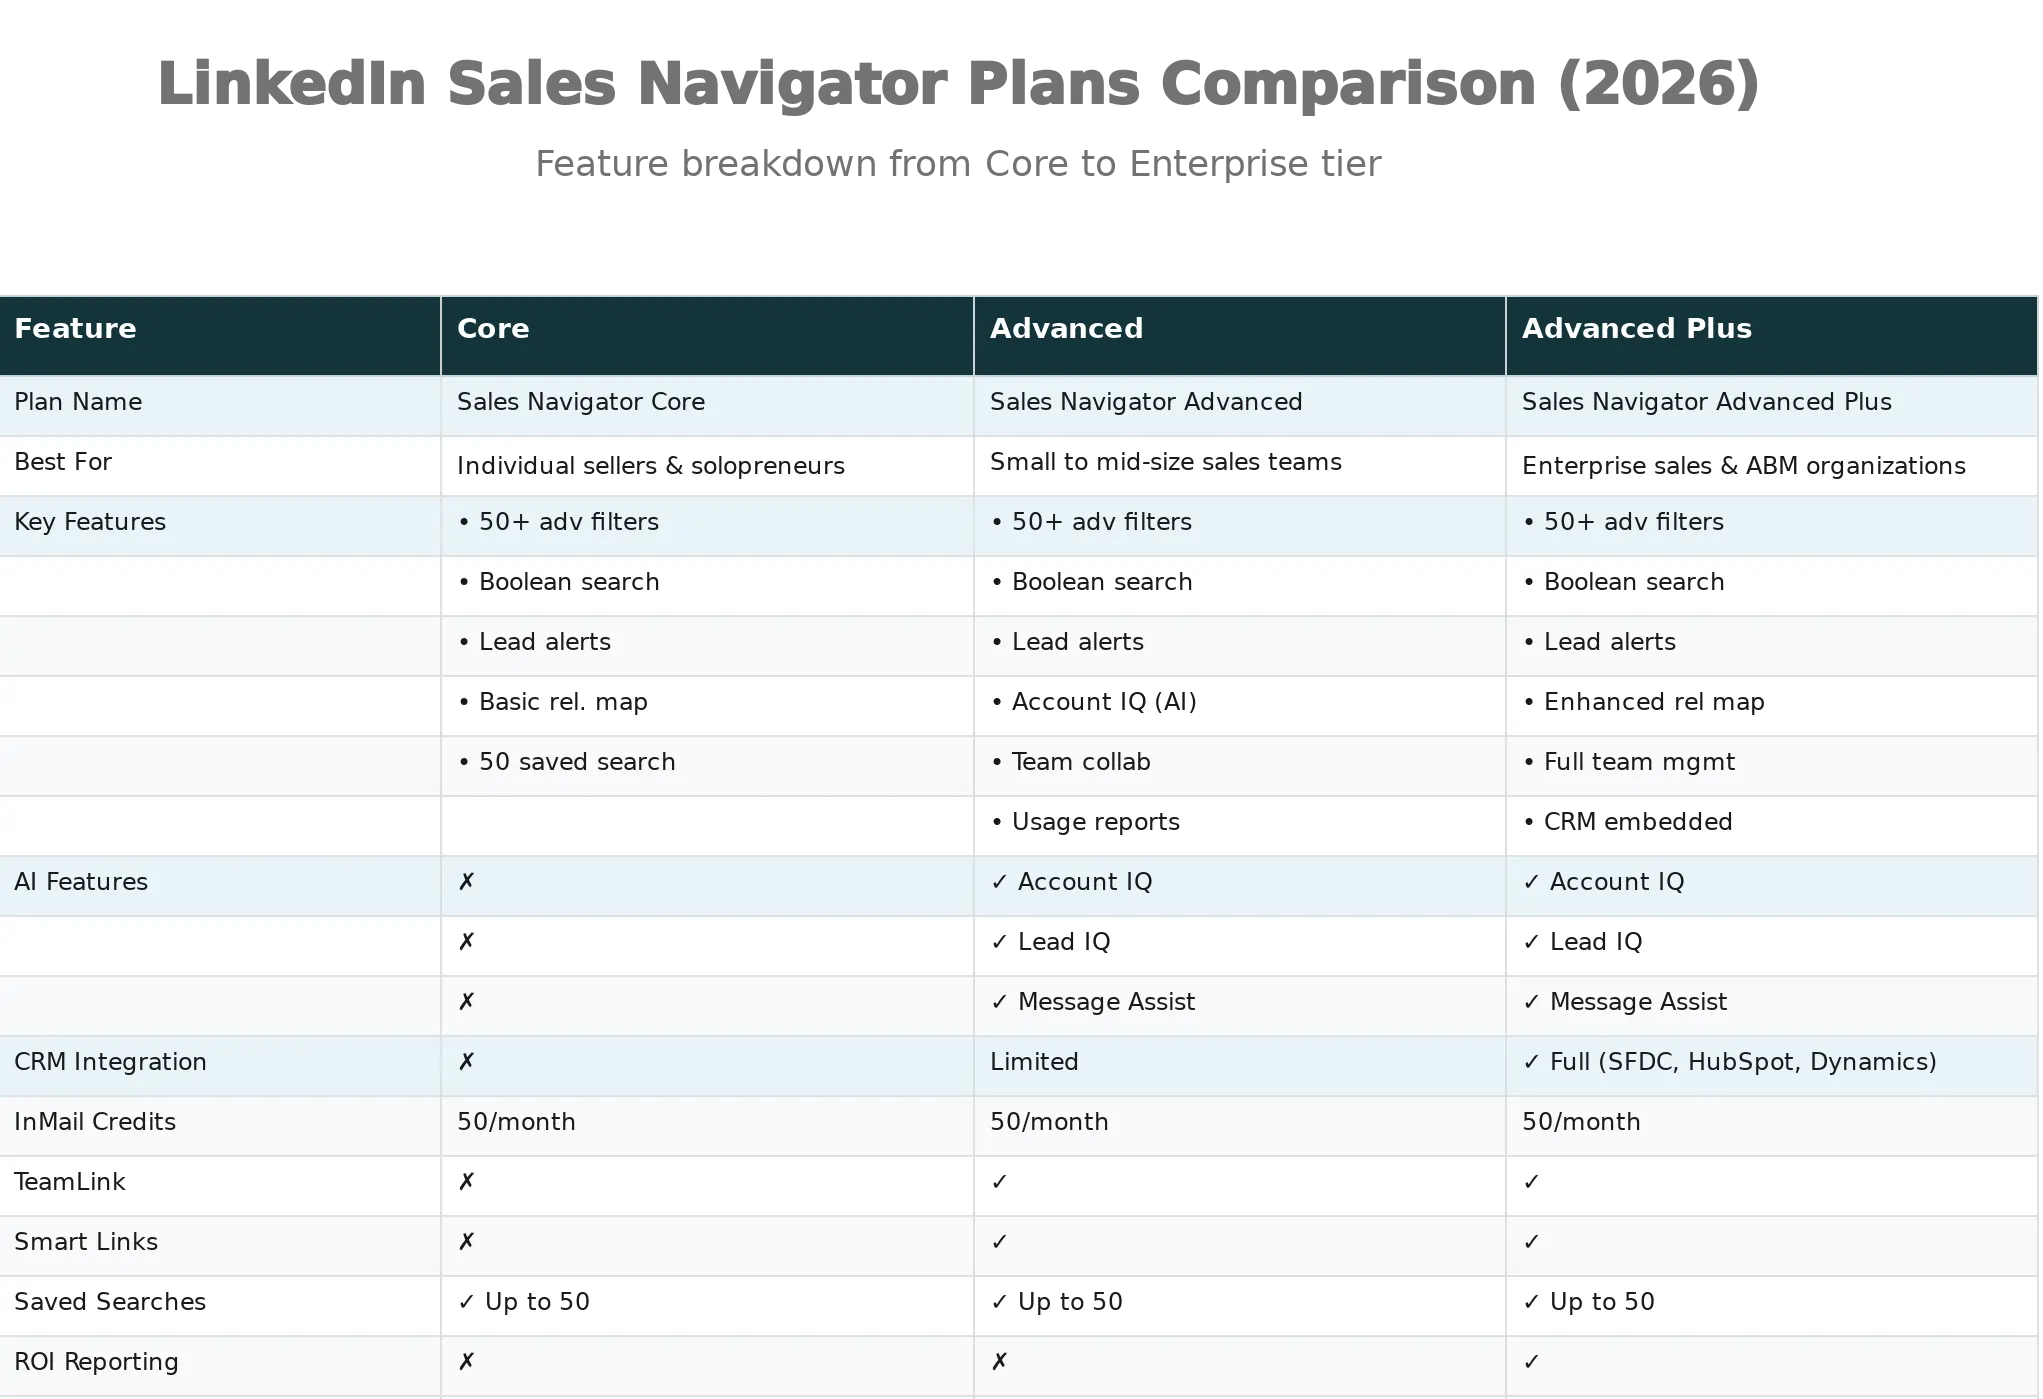
Core Plan ($): Best for individual sellers and solopreneurs who need basic advanced search and lead tracking. Includes 50+ search filters, saved searches, and alerts—but lacks AI features and CRM integration.
Advanced Plan ($$): Ideal for small-to-mid-size teams (2+ users) who leverage AI insights. Adds Account IQ, Lead IQ, Message Assist, TeamLink for warm introductions, and Smart Links for engagement tracking.
Advanced Plus Plan ($$$): Purpose-built for enterprise teams running account-based marketing (ABM). Unlocks full CRM integration (Salesforce, HubSpot, Microsoft Dynamics 365), ROI reporting, and embedded experiences that bring LinkedIn insights directly into your sales workflow.
Recommendation for B2B Growth Agencies: The Advanced plan offers the best ROI if you’re managing multiple client accounts or your own pipeline. The AI features (especially Account IQ and Message Assist) significantly accelerate research and personalization, while Smart Links provide engagement data that informs follow-up timing.
Part 2: Finding and Filtering Leads
Step 3: Execute Advanced Lead Searches with Strategic Filters
LinkedIn Sales Navigator provides 50+ search filters. The key is combination strategy: use 2–3 high-signal filters rather than stacking 7–8 weak ones.
High-Signal Filter Combinations:
- Seniority level + Current job title + Posted on LinkedIn in last 30 days = Active decision-makers
- Company size + Industry + Changed jobs in last 90 days = Transitioning leaders (warm leads)
- Location + Function + Years in current position = Stability signals (less likely to leave)
Example Workflow:
- Open “Lead Search” on Sales Navigator homepage
- Add filter: Seniority = “Director” or “VP” or “C-level”
- Add filter: Current job title contains “marketing” or “growth” (use dropdown)
- Add filter: Company size = “51-200 employees”
- Add filter: Posted on LinkedIn in last 30 days = Yes (Spotlight filter)
- Review results: typically 200–2,000 qualified prospects
Pro Tip: Avoid the “Industry” lead filter on Sales Navigator—it relies on self-reported user data and is often inaccurate. Instead, use “Account Search” to filter by company industry first, then drill into individual decision-makers.
Step 4: Leverage Spotlight Filters to Identify Warm Leads
Spotlight filters surface prospects actively engaging on LinkedIn—a strong intent signal.
Key Spotlight Filters:
- Posted on LinkedIn in last 30 days: Indicates active users, more likely to see and respond to messages
- Changed jobs in last 90 days: Transition creates budget authority and new initiatives; these prospects are open to exploring new solutions
- Follows your company: Already aware of your brand; natural warmth in outreach
- Shared activity: When teammates comment on or update a shared lead list (Advanced/Advanced Plus only)
- Buyer intent: Shows which companies are actively researching solutions in your category (Advanced/Advanced Plus only)
Action: When building your lead lists, always filter for at least one Spotlight signal. Job changers and recent posters convert 3–4x faster than dormant profiles.
Step 5: Refine with Boolean Search for Precision Targeting
Boolean search is your power tool for finding exact profile combinations that keyword filtering alone cannot surface.

Boolean Operators in Sales Navigator:
- AND: Combines multiple terms (all must be present). Example: “VP of Sales” AND B2B AND SaaS
- OR: Includes any of the terms. Example: CEO OR “Founder” OR “Co-Founder”
- NOT: Excludes unwanted terms. Example: “Head of Marketing” NOT Agency NOT Consultant
- Parentheses (): Groups terms for complex logic. Example: (“VP of Growth” OR “Head of Demand Gen”) AND (B2B OR SaaS) NOT (Freelancer OR Contractor)
- Quotes (“”): Searches exact phrases. Example: “Sales Navigator” “lead generation”
Where to Use Boolean Search:
- Keyword search bar (searches entire profile including headline, summary, skills)
- Current job title filter (focuses only on current job titles, more precise)
- Company name or industry fields (for account-level searching)
Practical Examples for Growth Marketing Agencies:
- (Marketing AND (Growth OR Demand OR Revenue)) AND (startup OR SaaS) AND (“2024” OR “2025”) = Marketing leaders at early-stage SaaS actively hiring
- (“Account Based” OR ABM OR “strategic accounts”) AND (B2B) NOT (agency OR consultant) = In-house ABM practitioners
- (HR AND (recruiting OR staffing OR “talent acquisition”)) AND (Indian OR India) AND (scaling OR growth) = Indian HR leaders expanding recruitment operations
Step 6: Set Up Saved Searches and Alerts
Static searches become outdated. Saved searches continuously surface fresh prospects matching your criteria.
Action Steps:
- Once you’ve built a high-performing search, click “Save this search” at the top of your results
- Name it clearly: “HR Leaders – India – Growth Stage – Job Change Signal”
- LinkedIn automatically notifies you weekly when new prospects match your saved criteria (up to 50 saved lead searches and 50 saved account searches)
- Review new matches in your “Alerts” tab weekly
Create a “Do Not Target” List:
- Add current clients (to avoid awkward outreach)
- Add closed-lost opportunities (past rejections)
- Add competitors (to avoid wasted efforts)
This prevents team misalignment and maintains outreach professionalism.
Part 3: Organizing and Understanding Your Prospects
Step 7: Build and Segment Lead Lists by Funnel Stage
Lead Lists transform scattered prospects into an organized pipeline.
Recommended Segmentation Structure:
| List Name | Criteria | Action |
| Cold Leads | No prior interaction, fits ICP | Initial research and outreach |
| Warm Leads | Job change, recent post, shared connection | Personalized InMail within 24-72 hours |
| Hot Leads | Opened your content, replied to message, engaged with post | Priority follow-up, qualification call |
| Do Not Target | Existing clients, competitors, closed-lost | Archive/exclude from future campaigns |
How to Create and Manage Lists:
- When viewing a prospect’s profile, click “Save” → Select or create list
- Go to “Lead Lists” in left-hand menu to view and manage
- Within each list, add tags (Campaign Q1, Competitor, Budget Owner) and notes for team alignment
- Set list-specific alerts to track updates on high-priority prospects
Pro Tip: Use tags to denote buying signals. Tags like “Budget_2026,” “Hiring_Growth,” “New_CMO” help you quickly prioritize follow-up when alerts trigger.
Step 8: Use Account Search and Account Lists for Multi-Threading
Account-based selling requires mapping decision-makers within target accounts, not just finding individual leads.
Account Search Workflow:
- Click “Account Search” in Sales Navigator (different from lead search)
- Filter by: Company size, Industry, Revenue range, Headcount growth, Funding rounds
- Click into an account to view its “Account Page” (shows Account IQ summary if you’re on Advanced/Advanced Plus)
- Identify 3–5 key stakeholders (decision-maker, budget owner, end-user champion, technical evaluator, procurement)
- Save the account to an “Account List”
Why Account-First Matters:
Research consistently shows that sales cycles accelerate when you engage multiple stakeholders in parallel. Rather than relying on one contact, map the buying committee. If your initial contact leaves the company or doesn’t champion your solution, you have warm fallback conversations already in motion.
Step 9: Leverage Account IQ and Lead IQ for Deep Insights
Account IQ and Lead IQ are AI-powered features available on Advanced and Advanced Plus plans. They’re time-savers that replace hours of manual research.
Account IQ (AI-Powered Account Summaries):
- Automatically generates a one-page summary of a target company: business model, recent news, strategic priorities, competitive positioning
- Shows why your solution is a fit for that specific account
- Highlights key decision-makers and their roles
- Indicates headcount and revenue growth trends
How to Use: Before you reach out to anyone at a company, spend 2 minutes reading the Account IQ summary. It gives you the context to reference in your message, making it feel personalized rather than generic.
Lead IQ (Personalized Lead Insights):
- Surfaces a prospect’s interests, career trajectory, and likely motivations
- Highlights shared experiences (alma mater, past employers, mutual connections)
- Shows recent activity (posts, comments, job changes)
- Suggests conversation starters based on their profile and activity
How to Use: When composing an InMail, reference a Lead IQ insight. Example: “I noticed you were promoted to Head of Marketing at [Company]—congratulations. We’ve helped 12 similar B2B teams accelerate pipeline with [solution]. Would love to share a quick case study.”
Part 4: Research and Message Preparation
Step 10: Deep-Dive Research Before Outreach
Your message quality depends on how well you understand the prospect. Use this 5-minute research framework:
Research Checklist:
- Account IQ Summary (1 min): Read the AI-generated company overview. Identify strategic priorities.
- Recent Posts (1 min): Check the “Recent Activity” tab. Did they post about hiring, funding, or industry challenges?
- Job Timeline (1 min): Are they 3 months into a new role? Recently promoted? Onboarding signals are strong conversation starters.
- Shared Connections (1 min): Do you have mutual connections? Can a colleague make a warm introduction (better than cold InMail)?
- Lead IQ Insights (1 min): Any shared alma mater, past employer, or mutual interests that create natural rapport?
Output: 1–2 contextual conversation starters for your message.
Step 11: Understand When to Use InMail vs. Connection Requests
Use InMail When:
- Prospect is a C-level executive (less likely to accept cold connection requests)
- You’re running a time-sensitive campaign (InMail gets seen faster)
- The prospect is 2nd or 3rd-degree connection (connection request visibility is limited)
- You have limited warm paths into the account
Use Connection Request When:
- You can reference a warm connection or shared experience
- The prospect is 1st-degree connected to you
- You’re building a long-term relationship (connection creates future messaging opportunity)
- You have a strong contextual reason to connect first
InMail Limits: Core, Advanced, and Advanced Plus plans all offer 50 InMail credits per month. Use these strategically on high-fit, high-intent prospects.
Step 12: Draft Personalized Messages with Message Assist
Message Assist (early access on Advanced/Advanced Plus) generates personalized InMail drafts using AI. This is transformative if you’re managing a large pipeline.
How to Use Message Assist:
1) Navigate to a prospect’s profile
2) Click “Message”
3) Start typing, then click “Draft with AI” at the bottom of the compose window
4) The tool generates a personalized first-touch InMail based on:
- Account IQ insights
- Lead IQ data
- Your product/service details (set in admin settings)
- Shared connections and experiences
5) Review and edit the draft (AI captures tone but lacks your unique positioning)
6) Send the customized message
Best Practices for Message Assist:
- Always review and edit the draft. The AI provides a strong foundation, but your unique value proposition and personality are what convert.
- Use it for your first 100 prospects to save time, then refine the template based on reply rates.
- Still personalize: replace generic compliments with specific insights from their recent posts or job changes.
Step 13: Compose Winning Outreach Messages
If you’re not using Message Assist or want to hand-craft messages, follow these three proven frameworks:
Framework 1: The Social Proof Opening (Best for Problem-Aware Prospects)
“I noticed you recently posted about [specific challenge]. We’ve helped [similar company] solve this by [tangible outcome]. Would be worth a 15-minute conversation?”
Framework 2: The Trigger Event Opening (Best for Recently Transitioned Prospects)
“Congrats on your promotion to Head of Marketing at [Company]. These first 90 days typically involve reassessing the tech stack and demand strategy. We’ve worked with 8 similar mid-market SaaS teams to accelerate their outbound. Worth exploring?”
Framework 3: The Shared Experience Opening (Best for Warm Leads)
“Both [School/Company/Group], so figured I’d reach out. We’re helping [ICP] with [specific problem] and I think there’s a fit. Available for a quick call this week?”
InMail Message Structure:
- Subject line (max 200 characters): Intriguing, not clickbait. Example: “Faster hiring pipeline for [Company]?”
- Body (max 1,900 characters): Hook (what triggered the outreach) + Value prop (specific outcome) + CTA (next step, e.g., “15-min call”)
- Signature: Keep professional; limit to 150 characters
Common Mistakes to Avoid:
- Generic openings: “I saw your profile—let’s connect” goes straight to trash
- Feature dumps: Talking about your product’s 47 features when prospects care about outcomes
- Pressure tactics: “Call me at 10 AM tomorrow” kills response rates; offer options
- No context: If using a template, you lost. Always reference something specific to their profile
Part 5: Engagement and Advanced Features
Step 14: Use Smart Links for Engagement Tracking
Smart Links (Advanced/Advanced Plus plans) allow you to share content (PDFs, case studies, decks, ROI calculators) and track who engages and how deeply.
Engagement Data Smart Links Provide:
- Time spent on each page/slide
- Specific slides or sections viewed (and duration)
- Number of times reopened
- Whether they progressed to the pricing slide or CTA
- Device used and approximate location
How to Set Up:
- In Sales Navigator, go to “Smart Links”
- Upload your content (PDF, proposal, deck, calculator)
- Create a branded link
- Share with prospects via InMail or email
- Monitor engagement in real-time
Strategy: When a prospect spends 20+ seconds on your pricing slide or reopens your proposal 3 times, that’s a buying signal. Follow up within 24 hours while the content is fresh in their mind.
Step 15: Activate the “Connections Of” Filter for Warm Paths
This underrated feature helps you uncover hidden warm introductions.
How It Works:
- Identify a well-connected person in your target market (often a customer or mutual connection)
- In Lead Search, use the “Connections of [Person’s Name]” filter
- Combine with other filters (location, job title, company size)
- Results show prospects already connected to that person
Real-World Example:
You’re targeting CMOs in Bangalore. Your colleague Priya knows several tech company leaders in the city. Instead of cold outreach to 100 Bangalore CMOs, search “Connections of Priya” + “CMO” + “Bangalore” = 20–30 prospects who already know and trust Priya. Your outreach now reads:
“Hi [Name], I’ll be in Bangalore next week. Priya and I have been collaborating on [initiative], and she mentioned you’re doing impressive work in [industry]. Would love to grab coffee and explore potential synergies.”
Trust multiplier: The warm connection increases response rates by 3–4x compared to cold outreach.
Step 16: Implement Relationship Map for Account-Based Selling
Relationship Map (available on all plans, enhanced on Advanced Plus) visualizes the decision-making structure within a target account.
What Relationship Map Shows:
- Organizational hierarchy (who reports to whom)
- Job titles and functions
- Notes and relationship strength indicators
- Key stakeholders you’ve already engaged
- Gaps in your multi-threading coverage
How to Use:
- Navigate to an account page
- Click “Relationship Map” (or “Account Map” on some views)
- Add key decision-makers manually or let Sales Navigator auto-populate from LinkedIn data
- Add notes on each stakeholder (e.g., “Budget owner,” “Skeptical on solution fit,” “Active influencer”)
- Track relationship strength (e.g., “Cold,” “Warm,” “Engaged”)
- Identify gaps: If you’re only talking to IT but not Finance, add the CFO to your outreach plan
Team Collaboration: On Advanced Plus, share Relationship Maps with your team. Prevents double-tapping and ensures everyone knows who’s owning each stakeholder relationship.
Part 6: Tracking, Follow-Up, and Optimization
Step 17: Monitor Alerts and Trigger-Based Follow-Up
Real-time alerts on saved prospects are your competitive advantage. Job changes, funding announcements, and company growth all signal buying readiness.
Alerts to Track:
- Job changes: Newly hired decision-makers are evaluating solutions in their first 90 days
- Company funding: Post-Series A/B is a growth inflection point; hiring and tool adoption accelerate
- Headcount growth: Scaling from 50 to 150 employees signals new budget and operational needs
- Content engagement: When a prospect interacts with your LinkedIn post or views a Smart Link, reach out within 24 hours
- Shared activity: TeamLink alerts show when your colleagues have common connections
Follow-Up Timing Rule: Reach out within 24–72 hours of the trigger event. The signal is hot; delays cool it.
Example Workflow:
- Alert: “John just changed jobs from Company A to Company B, now Head of Sales”
- Your Action: Within 24 hours, send an InMail referencing the move and the new opportunity
- Message: “Congrats on the move to Company B. We’ve helped 3 of your competitor’s sales teams accelerate pipeline with [solution]. Happy to share learnings specific to your new role?”
Step 18: Structure Your Outreach Workflow
One message isn’t a strategy; it’s wishful thinking. Structure multi-touch sequences that respect prospect engagement signals.
Recommended Workflow:
| Touch | Channel | Timing | Message Goal |
| 1 | InMail or Connection | Day 1 | Introduce value prop, ask for conversation |
| 2 | LinkedIn Message | Day 5 (if no reply) | Softer reminder, different angle |
| 3 | LinkedIn Post Engagement | Day 10 | Like/comment on their recent post, light re-engagement |
| 4 | InMail (if Advanced) | Day 14 | Final touchpoint, lower barrier ask (“2-min call?”) |
| 5 | Archive or Nurture | Day 21 | Move to “nurture” list, drip content over time |
Tools to Track: Use your CRM (Salesforce, HubSpot, Pipedrive) to log all touches. Advanced Plus plans integrate directly with Sales Navigator, auto-logging InMails.
Step 19: Measure and Optimize Performance
Not all lead-generation efforts are created equal. Track these metrics to refine your approach:
Key Metrics to Track:
- Reply rate: % of InMails/messages that receive a response (target: 10–15% for cold, 25%+ for warm)
- Positive response rate: % of replies that express interest (target: 50–60% of replies)
- Meeting booked rate: % of leads that convert to a call/demo (target: 10–20% of conversations)
- Cost per qualified lead: Total Sales Navigator investment ÷ qualified leads sourced
- Sales Navigator ROI: Revenue from closed deals sourced via Navigator ÷ Navigator cost
Optimization Points:
- Low reply rate? → Your subject lines or opening hooks lack specificity; reference more personal details from their profile
- High reply rate, low positive response? → You’re attracting interest but not clearly positioning your value; strengthen your value prop in initial message
- Good replies but no meetings? → Your CTA or next steps are unclear; explicitly ask for a 15-minute call and offer 2–3 specific times
- High meeting rate but low close rate? → The sales conversation isn’t translating interest into opportunities; improve discovery questions
Step 20: Create a Repeatable Process Template
The best lead-generation systems are repeatable and documented.
Template to Establish:
- Weekly Cadence: Monday: review saved search alerts → Tuesday: research and list-build → Wednesday–Thursday: outreach (InMails/connections) → Friday: engagement tracking and follow-up
- Search Library: Maintain a spreadsheet of your top 5–10 high-performing saved searches. Track: search name, filters used, weekly new matches, conversion rate
- Message Templates: Create 3–5 opening templates (by industry or segment), test variations, and lock in top performers
- Lead List Maintenance: Quarterly, audit lead lists to archive closed-lost prospects and refresh warm leads based on recent activity
- Team Alignment: If using Advanced Plus, monthly sync with your team on Relationship Maps to ensure multi-threading and prevent duplicates
Measurement Dashboard: Build a simple monthly dashboard tracking new prospects added, outreach sent, replies received, meetings booked, and deals sourced.
Advanced Tips for 2026
Leverage TeamLink for Warm Paths (Advanced/Advanced Plus)
TeamLink shows 2nd and 3rd-degree connections of your colleagues, even if they’re not Sales Navigator users. This exponentially increases warm path discovery. If you have a team, brief everyone monthly: “Who do you know at Target Account A?” TeamLink will surface them.
Use Account IQ to Identify Expansion Opportunities
If you’re working with an existing client, use Account Search to identify other divisions, subsidiaries, or sister companies that could benefit from your solution. This turns a single-company relationship into a multi-account opportunity.
Export and Enrich Data Responsibly (Advanced Plus)
Advanced Plus allows CSV exports. Before sending outreach, run your list through email verification tools (Hunter.io, RocketReach, Clearbit) to ensure deliverability. Wrong email addresses tank campaign ROI.
Test Boolean Searches in Small Batches
Before running a full campaign against a new Boolean search, test it on 50–100 prospects. Review 10–15 profiles to ensure relevance. LinkedIn’s data isn’t perfect; validation before scaling saves wasted outreach.
Quick Reference Checklist
- Defined ICP and personas with 5+ specific criteria
- Chose appropriate Sales Navigator plan for your team
- Set up 5–10 saved searches with Spotlight filters
- Created Boolean search strings for your top 3 target segments
- Built Lead Lists segmented by funnel stage
- Set up alerts for job changes, funding, and company growth
- Reviewed Account IQ for target accounts
- Drafted 3 personalized message templates
- Established weekly outreach cadence (InMail, connections, follow-up)
- Began tracking metrics (reply rate, meeting booking rate, cost per lead)
Conclusion
Sales Navigator delivers outsized results only when it sits on top of clear strategy and disciplined execution. The teams that win with it don’t “dabble” with a few filters and ad hoc InMails; they build a tight ICP, lean into live signals like job changes and funding, and use AI insights to remove guesswork from research and outreach.
By combining advanced search, Spotlight filters, Boolean logic, Account/Lead IQ, Smart Links, and relationship mapping into a single weekly rhythm, you convert a static database into a live, prioritized queue of people who are actually ready to talk. Over time, your saved searches get sharper, your templates get stronger, and your metrics tell you exactly where to double down.
Treat this 2026 Sales Navigator setup as an operating system, not a one-off campaign. If you implement the steps consistently, Sales Navigator stops being a nice-to-have and becomes a core revenue channel that supports six and seven-figure deals for your sales team or growth agency.
FAQs
1) Is LinkedIn Sales Navigator Actually Worth It?
Yes, but only if you’re closing high-ticket B2B deals (€5,000+) with 60+ day sales cycles and sending 15+ personalized outreach messages weekly . A 5-person team on Advanced costs $8,100 annually and needs €25,000–30,000 in closed deals to break even . For SMBs selling €1,000–2,000 deals, tools like Apollo often deliver better ROI .
2) How Much Does a Sales Navigator Cost Per Month, and Which Plan Should I Choose?
Core: $79.99/month (individuals, basic filters). Advanced: $134.99/user/month (2+ users, AI features like Account IQ and Message Assist) . Advanced Plus: $200–300+/user/month (enterprise, full CRM integration) . Budget an extra $50–100/month for email enrichment tools and $20–50/month for Zapier if not using native CRMs .
3) How Many InMail Credits Do I Get, and What’s a Realistic Response Rate?
All plans include 50 InMail credits monthly, maxing at 150 accumulated credits (90-day expiry) . You get 1 credit refunded if recipients respond within 90 days . Response rates: generic messages 2–5%, moderately personalized 7–12%, highly personalized 15–25% . C-level executives typically respond at 5–8%, mid-market managers at 15–20% .
4) Why Can’t I Export My Leads to CSV, and What’s the Workaround?
Sales Navigator has no native CSV export due to data privacy and Terms of Service restrictions . Workarounds: manual copy-paste (30–50 leads/hour), scraping tools like GiveMeLeads ($20–60/month, violates ToS), CRM sync (Advanced Plus only), or Zapier integration (+$20–50/month with 10–15 minute delays) .
5) Does Sales Navigator Integrate with My CRM?
Native integration works seamlessly with Salesforce, HubSpot, Dynamics 365, Oracle Sales, Gong, and Outreach . Other CRMs (Pipedrive, Zoho, Freshsales) require Zapier middleware (+$20–50/month, 10–15 minute sync delays) . Advanced Plus saves approximately 65 hours annually through embedded profiles, Account IQ in CRM, and auto-logging, making it worth the upgrade for Salesforce/HubSpot users .
About The Author
Get A Free Consultation
I can help you grow your B2B business.
Ready to Generate 40-80+ Qualified Leads/Month?
Get a free 30-minute Growth Blueprint call. You’ll learn:
- Your current cost per lead vs. industry benchmarks
- Which channels are leaving money on the table for firms like yours
- A 90-day roadmap to predictable lead generation
- Specific positioning recommendations for your segment
No sales pitch. Just honest advice.
